
Workday Reports-as-a-Service
Visier can retrieve data through this connector if the following requirements are met.
You can use the following methods to retrieve data from Workday:
We recommend starting with the Workday API, which allows you to select tables directly. Depending on your requirements, you can then use Reports-as-a-Service to access existing Workday custom reports or the Workday Query Language to create and run custom queries. These methods share the same Workday connector credentials and you can select your preferred method when creating a Workday connector in Studio.
Visier's Workday Reports-as-a-Service connector doesn't have a set list of tables it can extract. Rather, you can allow Visier to retrieve any advanced Workday report you've built. The content and data within the reports are controlled by you.
If table sources are enabled, you can select the source type during connector credential creation. Select one of:
- File sources: File-based containers that use regex and override behavior to manage data. For more information about acceptable files, see Data File Guidelines.
- Table sources: Row-based containers that support incremental updates and SQL transformations during sync. For more information, see Use SQL with Table Sources.
The following table describes the differences between the behavior of each source type.
|
File sources |
Table sources |
|---|---|
|
Each data transfer or extraction outputs to a unique file. |
Each data transfer or extraction directly modifies the same table. |
|
Use Visier Extraction Language to query records in a source's Records tab or SQL to query sources in the Data > Query room. For more information, see Query Source Data. |
Use Spark SQL to interact with the table data. For more information, see Use SQL with Table Sources. |
|
To delete an individual's data, such as for GDPR compliance, open a Visier Technical Support ticket to remove the information one-by-one from every extracted file. |
To delete an individual's data, such as for GDPR compliance, use a DELETE SQL query on the table without contacting Visier Technical Support. Note: The snapshot retention period specifies how long to keep previous snapshots of tables before permanently deleting them. You can set the retention period between 1 and 180 days. The default is 3 days. |
|
The data is available in the Data Transfers room. For more information, see Navigate Studio. |
The data is available in the associated table source in the Sources room. For more information, see Sources. |
You cannot change the source type after creating a credential. To use a different source type, create a new credential.
Prerequisites
- Create an integration user in Workday.
- Ability to build Workday reports that:
- Allow Visier to extract historical data, not latest period snapshots.
- Are optimally performant and won't time out when pulled.
- Ability to troubleshoot and modify reports to give the expected results.
- Allow network and data traffic between Visier and your source system. For more information, see Allow Visier Connections.
Integration user
Create an integration user in your source system and assign it the appropriate security access so that Visier can retrieve your source data through this user. This includes the required security access to view the properties in the report.
|
Access |
Description |
|---|---|
|
Report access |
You must make the integration user the owner of the report. |
Connector credentials
Create a connector credential in Visier to authenticate and authorize access to your source system. Connector credentials can be created in Studio or through an API. For more information, see Set Up Data Connectors and "Create a connector credential" in API Reference. You will need to provide the following credentials in your connector credential configuration.
Workday supports the following methods for authentication:
- OAuth 2.0 (authorization code grant)
- Basic (username and password)
We recommend using OAuth 2.0 for authentication, especially if you plan to use the Workday Query Language (WQL) connector, which supports only OAuth 2.0. For more information, see Workday Query Language.
Tip: Having trouble finding your credentials in Workday?
In Workday, search for View API Clients. Check the Workday REST API Endpoint in the View API Clients page to find the Domain name and Implementation name, as shown in the following screenshot.
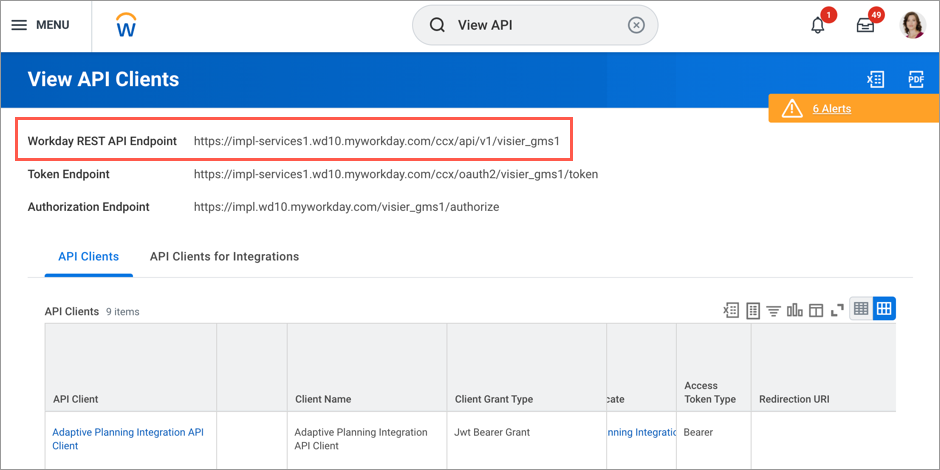
The Workday REST API Endpoint is https://impl-services1.wd10.myworkday.com/ccx/api/v1/visier_gms1. In this example, the Domain name is impl-services1.wd10.myworkday.com and the Implementation name is visier_gms1.
OAuth 2.0 authentication
For OAuth 2.0 authentication, you will have to set up an API client in Workday that uses the authorization code grant type. When setting up the client, we recommend that you select a non-expiring refresh token because Visier runs jobs on a scheduled interval. You won't have to worry about regenerating and reconnecting when the token expires at the end of its validity period. When the token expires, Visier will not be able to authenticate against Workday until the credentials are updated with a new token. After you configure the API client in Workday, you will have an API client ID, client secret, and refresh token.
You will need to provide the following credentials in your connector credential configuration:
|
Credential |
Description |
Example |
|---|---|---|
|
Domain Name |
The URL of your Workday instance. |
https://services1.myworkday.com https://wd2-impl-services1.workday.com |
|
Username |
The integration user’s username. |
IntegrationUser |
|
API Client ID |
The unique identifier of the API client you created in Workday to connect to Visier. |
Mixed-case alphanumeric string |
|
Client Secret |
The client secret of the API client you created in Workday to connect to Visier. |
Lowercase alphanumeric string |
|
Refresh Token |
The generated token of the API client you created in Workday to connect to Visier. |
Lowercase alphanumeric string |
| Implementation Name |
The tenant ID. |
vcorp |
Basic authentication
For basic authentication, you will need to provide the following credentials in your connector credential configuration:
|
Credential |
Description |
Example |
|---|---|---|
|
Domain name |
The URL of your Workday instance. |
https://services1.myworkday.com https://wd2-impl-services1.workday.com |
| Username |
The integration user’s username. |
IntegrationUser |
| Password |
The integration user’s password. |
Password1234 |
| Implementation name |
The tenant ID. |
vcorp |
| Integration system ID (Optional) |
To connect your custom attributes, provide an integration system ID. This is the result of creating a custom field override integration for Worker data in Workday. Note: Visier can only accommodate a single integration system ID, so you need to add every custom or calculated field that you want to bring into Visier to the same Workday system integration. |
b0685b69d8ac412582c0a44d7973f707 |
Create a connector
After you add your connector credentials, create a Workday connector in Studio to enable data extraction.
- In a project, on the navigation bar, click Data > Connectors.
- Use your Workday connector credentials to create a connector and select the Workday RaaS connector type when prompted. For instructions, see Set Up Data Connectors.
Settings
Additionally, after creating the connector in Visier, provide the following details in the connector's Settings tab.
- Workday report end date filter name: The end date filter name for the Workday report to retrieve. This allows Visier to extract the report in chunks if it's too large. In Workday, you define the filter name for each report, and then provide that filter name to Visier. If extracting multiple reports in one connector, the filter name must be the same for all reports.
- Workday report start date filter name: The start date filter name for the Workday report to retrieve. This allows Visier to extract the report in chunks if it's too large. In Workday, you define the filter name for each report, and then provide that filter name to Visier. If extracting multiple reports in one connector, the filter name must be the same for all reports.
- Workday RaaS URLs: The report URL to retrieve from Workday. The report must be in CSV or XML format. If retrieving multiple reports, separate the report URLs with a comma.
- Restatement date column: The name and date format of the column in the report to determine the rolling restatement window. Only applicable if this connector uses table sources. When set, records on or after the extraction window start will be deleted before reinserting the latest extracted data.
How the connector loads data
Initially, data connectors retrieve a full history for each subject to generate an initial history of events. In each subsequent data retrieval, each connector handles the data load differently.
- Full load: All data from the source system is loaded into Visier.
- Delta load: Only changed data is loaded into Visier. A delta load may take either the entire history or a specific number of years of history for each changed record.
- Snapshot load: All data at a particular point in time. A snapshot load does not contain historical records or show changes over time.
- Partial load: A subset of data is loaded into Visier.
Initially, this connector retrieves all the data in the report. After the initial load, this connector only retrieves data for changed records. For changed records, this connector retrieves the record's full history. You can configure how many years of history is retrieved.